Only spent a few hours on the cockpit today but things are moving along nicely, today I mainly relocated the painted MIP frame into my spare bedroom of where the cockpit will mainly be developed over winter as next year I’ll be looking to build a dedicated brick building for it in the garden.
So today to quickly summarise before I go into detail and post up some photo’s these are the main things that I achieved today:-
- Constructed the MIP stand in the spare bedroom.
- Mounted the seat on the newly constructed and painted seat stand.
- Covered my glare-shield cover in faux leather.
- Dismantled some monitors ready for the MIP panels.
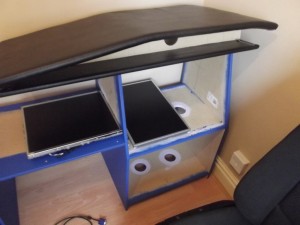
I have been having withdrawal symptoms from not flying online recently so I did a couple of flights today (EGSS -EGAA) but afterwards I cleared out my spare room (what was my home-office) bought in the panels from the shed and using some newly acquired dry lining screws (black in colour) I then screwed the MIP frame together – this is the first time since painting the panels that I have screwed it all together and I was really impressed with how it looked and one the MIP screen panels are mounted will look just fantastic! 🙂
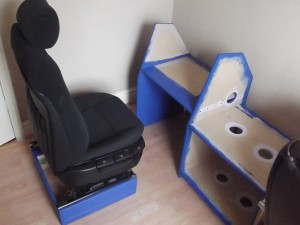
Next I went up into the loft and found the upper part of what is now my captain’s seat and then screwed and mounted the seat to the painted seat stand… things are now coming together nicely – I have not yet re-located the centre pedestal from the shed into the house as yet as I’ll need the space when installing the new MIP panels, LCD screens, I/O hardware and electronics for the MIP panels once they arrive – I’m hoping that the MIP panels, landing gear level and the other MIP panel’s will turn up this coming week so I can sort out the entire MIP next weekend as I’m now at a stage where I have done as much as I can until I get some more of my bits that I have ordered.
As I knew I was planning on covering the glare-sheild this weekend, I gave my mum a call during the week in the hope that she would have an upholstery stapler (a heavy duty staple gun) as being an artist she generally works with canvas and wooden frames and was happy to find that she did so that saved me spending yet more money and I was lucky enough to be able to borrow it…. So today came the time to cover the glare sheild sections in the faux leather to make it look like how the real aircraft does and I was extremely happy with the results.

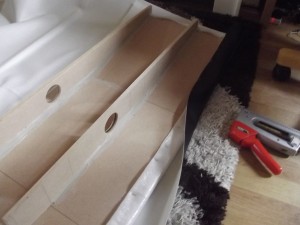
Applying the Faux Leather over a layer of foam sheet to give a slight cushion effect to the glare-shield.
Since I first started building my Mk.1 cockpit I had been saving some sheet foam type of cloth which I finally managed to use by layering underneath the top glare-shield cover to give a padded feeling, see the photo on the right of how I achieved this by first stapling the foam layer and then applying the leather over the top… the end result is extremely authentic!
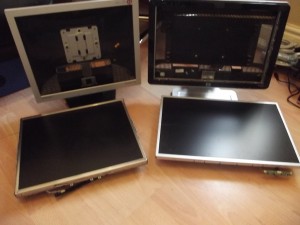
Now that I had run out of staples and was unable to start the upper padded pedestal rim (that should be covered with faux leather too) I decided to take appart a couple of LCD monitors which I will be using inside my MIP frame (1x 17inch LCD monitor and 1x 19inch widescreen) I was surprised just how easy it was to remove the bezels and outer monitor housing – I’m now just waiting for the MIP monitor panels to arrieve so I can then ensure that when I mount the LCD screen’s they are in the required positions.
Plans for tomorrow then… I should probably spend the morning with the children (my two girls, Molly and Ruby) maybe take them to the park for a couple of hours if the weather is nice as I’ve neglected them a little the last couple of weekends! – Tomorrow afternoon though I’ll more than likely do another flight and then wire up my custom upper centre pedestal panel to a BBI-32 card and the USBOutputs card and do a video explaining how I utilise the USBOutputs card the BBI-32 as I know a friend of mine (Joerg) is interested in how the USBOutputs card works with the Wilco, so I’ll be demonstrating that 🙂

My achievement today.. Two bezel-less screens, MIP constructed and the glare-shield covered with faux leather!
So at the end of today this is what the MIP and glare-shield looks like – be aware that this is not where the actual MIP will be placed, this is just a temporary place so I can work on it over winter before moving to a larger room/building that I have planned for the back garden.
More updates tomorrow evening hopefully! – Thanks for reading! 🙂


hello can you send me its dimention